Proton Hyperion Setup In 2025: Part II
Overview
In the previous post, I explained how to configure nodeos for a state history node on the Proton chain. This post explains how to complete the rest of the process, and assumes you have a proton node that is fully synchronized with the entire state history already indexed to the head block.
The Process
- Installation of the remaining requirements
- Configuration of Hyperion for Proton Chain, your brand's URL, logo, contact data, alerts, etc
- Run
./run proton-indexerin ABI scan mode (took about 10 hours or so in my case) - Modify the
config/chains/proton-chain.jsonfile after ABI scan completes - Run the index scan. This must be done in batches. How many depends on when you're reading this and what kind of hardware you've got. In my case, it's looking like it'll be something like 17 - 24 batches, each taking a few hours to complete.
- When this is completed, launch
./run proton-api, and place it behind a reverse proxy server such as Nginx for public access under a subdomain of your entity's domain.
Installing Requirements
This series is basically intended to offer some guidance because the official Hyperion documentation is a little daunting, and the PDF file found in the proton.start repository is somewhat outdated. However, so far, and with a little luck and God willing, I think that it's sufficient to say that between those two documents and the blogs from EOSphere, the infomation is out there. Don't be afraid to ask for help, but most if not all of the information that you need can be found in the Hyperion docs, EOSphere blogs, and the Proton PDF guild.
Hyperion documentation | Proton's Hyperion Guild | EOSphere Blog
If you're stumbling across this post and have not yet set up your state history node, see the part 1 of this series for detailed instructions setting that up.
After your nodeos instance is synchronized with a full state history block log, you need to install a whole bunch of programs, including:
- Elasticsearch 8.7+ - Required for historical data indexing.
- Kibana 8.7+ - Optional, for visualizing Elasticsearch data.
- RabbitMQ (v 3.12+) - Required for message queuing between indexer stages.
- Redis - Required for caching and inter-process communication.
- MongoDB Community Server - Conditionally Required. Needed only if enabling state tracking features (features.tables.* or features.contract_state.enabled in chain config). See MongoDB section below for details.
- Node.js v22 - Required runtime environment.
- PM2 - Required process manager for Node.js applications.
- NODEOS (spring 1.1.2 or leap 5.0.3 recommended) - Required Antelope node with State History Plugin (SHIP) enabled.
Although it's recommended to manually install everything, I've found that the automated installation shell script actually works fine, although you will need to manually install the correct version of NodeJs, which as of the time I am writing this, according to the Hyperion documentation, is 22. The installation script installed version 24.
It also installed node locally, rather than globally, and while that may have worked, I was trying to follow the PDF in the proton.start, which stated that node should be installed globally with sudo. In any case, after I ran the installation script, I installed node version 22 globally and removed from my eos user's bashrc the PATH updates pointing to the local version 24 of nodejs. After doing that, I ran as eos user with sudo the following commands (referanced from the xpr.start PDF):
sudo npm install pm2@latest -g
sudo pm2 startup
Next, I read through the manual installation process found on the official Hyperion documentation, linked above, ensuring that the installer script didn't miss anything. I would suggest doing the same, as there are some important settings particularly for ElasticSearch that need to be changed. Other than ElasticSearch, the installer pretty much took care of everything. However, for security reasons, you will want to change and note the passwords for mongo and rabbitmq.
Take care to note the credentials for mongo and rabbitmq, as well as the password found in the file named elastic.pass found in your eos user's . ~/.hyperion-installer directory, as you'll need them later.
At this point, I cloned the Hyperion repository and began to figure out how to configure it.
git clone https://github.com/eosrio/hyperion-history-api.git
cd hyperion-history-api
npm ci
When I ran npm ci, I got an error about a missing library. The solution ended up being to make use of a third party repository and install the missing library. This will likely be an issue if you are on Ubuntu 22 as recommended, so if npm ci throws, just go ahead and run these commands:
sudo add-apt-repository ppa:ubuntu-toolchain-r/test
sudo apt-get update
sudo apt-get install --only-upgrade libstdc++6
Now, running npm ci will work.
Configuring Hyperion
Now, you can install the program, and create the connections.json file automatically with the hype-config tool found in the repository that you just cloned.
Install the program:
sudo npm install
Creating the connections config file:
./hyp-config connections init
You will be prompted for the connection information for all of the components, and other than the passwords that you hopefully changed, and including the elastic system password, you can accept the default options. Note that apparently when the Proton PDf file was written, the hyp-config tool must not have existed, and so far it seems you can safely use the tool to generate that file. If I recall correctly, no fields needed to be updated in the connections.json file.
To make sure that all worked, run ./hyp-config connections test to ensure that everything works. In my case, everything did work. I skipped over the section of the PDF that says "Edit ecosystem.config.js file located in the hyperion-history-api directory", because I didn't find this anywhere in the current Hyperion documentation, and went on to configuring the chain, as per the Hyperion documentation.
http=http://127.0.0.1:8888
ship=ws://127.0.0.1:8080
./hyp-config chains new proton --http $http --ship $ship
That command should produce config/chains/proton.config.json, which you will need to edit. I changed all of the fields that were different from the configuration present in the PDF file. I suppose it is safe to post that configuration here. I added comments to the fields that must be changed after the first index run, they're marked with a preceding _comment :
Warning: The proton PDF has a mistake in it that caused me a lot of banging my head against the wall: ds_pool_size cannot be 1 if you have ds_queues 2. Set scaling.ds_pool_size to 2.
{
  "api": {
    "enabled": true,
    "pm2_scaling": 1,
    "chain_name": "proton",
    "server_addr": "0.0.0.0",
    "server_port": 7000,
    "stream_port": 1234,
    "stream_scroll_limit": -1,
    "stream_scroll_batch": 500,
    "server_name": "hyperion.luminaryvisn.com",
    "provider_name": "Luminary Visions, LLC",
    "provider_url": "https://www.luminaryvisn.com",
    "chain_api": "http://127.0.0.1:8888",
    "push_api": "https://api.luminaryvisn.com",
    "chain_logo_url": "https://i.postimg.cc/0y5zcgwL/proton-xpr-logo.png",
    "explorer": {
      "home_redirect": false,
      "upstream": "",
      "theme": ""
    },
    "_comment_enable_caching": "set to true after bulk indexing",
    "enable_caching": false,
    "cache_life": 1,
    "limits": {
      "get_actions": 1000,
      "get_voters": 100,
      "get_links": 1000,
      "get_deltas": 1000,
      "get_trx_actions": 200
    },
    "access_log": false,
    "chain_api_error_log": false,
    "log_errors": false,
    "custom_core_token": "XPR",
    "enable_export_action": false,
    "disable_rate_limit": false,
    "rate_limit_rpm": 1000,
    "rate_limit_allow": [],
    "_comment_disable_tx_cache": "set to false after bulk indexing",
    "disable_tx_cache": true,
    "tx_cache_expiration_sec": 3600,
    "v1_chain_cache": [
      {
        "path": "get_block",
        "ttl": 3000
      },
      {
        "path": "get_info",
        "ttl": 500
      }
    ],
    "node_max_old_space_size": 1024,
    "node_trace_deprecation": false,
    "node_trace_warnings": false
  },
  "indexer": {
    "enabled": true,
    "start_on": 1,
    "stop_on": 0,
    "rewrite": false,
    "purge_queues": true,
    "_comment_live_reader": "set to true after bulk indexing",
    "live_reader": false,
    "live_only_mode": false,
    "_comment_abi_scan_mode": "IMPORTANT set to false after initial ABI scan",
    "abi_scan_mode": true,
    "fetch_block": true,
    "fetch_traces": true,
    "fetch_deltas": true,
    "disable_reading": false,
    "disable_indexing": false,
    "process_deltas": true,
    "node_max_old_space_size": 4096,
    "node_trace_deprecation": false,
    "node_trace_warnings": false
  },
  "settings": {
    "preview": false,
    "chain": "proton",
    "eosio_alias": "eosio",
    "parser": "3.2",
    "auto_stop": 0,
    "index_version": "v1",
    "debug": false,
    "bp_logs": false,
    "bp_monitoring": false,
    "ipc_debug_rate": 60000,
    "allow_custom_abi": false,
    "rate_monitoring": true,
    "max_ws_payload_mb": 256,
    "ds_profiling": false,
    "auto_mode_switch": false,
    "use_global_agent": false,
    "index_partition_size": 10000000,
    "max_retained_blocks": 0,
    "es_replicas": 0
  },
  "blacklists": {
    "actions": [],
    "deltas": []
  },
  "whitelists": {
    "actions": [],
    "deltas": [],
    "max_depth": 10,
    "root_only": false
  },
  "scaling": {
    "readers": 2,
    "ds_queues": 2,
    "ds_threads": 1,
    "ds_pool_size": 2,
    "indexing_queues": 1,
    "ad_idx_queues": 1,
    "dyn_idx_queues": 1,
    "max_autoscale": 4,
    "batch_size": 10000,
    "resume_trigger": 5000,
    "auto_scale_trigger": 20000,
    "block_queue_limit": 10000,
    "max_queue_limit": 50000,
    "routing_mode": "heatmap",
    "polling_interval": 10000
  },
  "features": {
    "streaming": {
      "_comment_enable": "set to true after abi scan",
      "enable": true,
      "_comment_trace": "set to true after abi scan",
      "traces": true,
      "deltas": false
    },
    "tables": {
      "proposals": true,
      "accounts": true,
      "voters": true,
      "permissions": true,
      "user_resources": false
    },
    "contract_state": {
      "contracts": {}
    },
    "index_deltas": true,
    "index_transfer_memo": true,
    "index_all_deltas": true,
    "deferred_trx": false,
    "failed_trx": false,
    "resource_limits": false,
    "resource_usage": false
  },
  "prefetch": {
    "read": 50,
    "block": 100,
    "index": 500
  },
  "hub": {
    "enabled": false,
    "instance_key": "",
    "custom_indexer_controller": ""
  },
  "plugins": {},
  "alerts": {
    "triggers": {
      "onApiStart": {
        "enabled": true,
        "cooldown": 30,
        "emitOn": [
          "http"
        ]
      },
      "onIndexerError": {
        "enabled": true,
        "cooldown": 30,
        "emitOn": [
          "telegram",
          "email",
          "http"
        ]
      }
    },
    "providers": {
      "telegram": {
        "enabled": false,
        "botToken": "",
        "destinationIds": [
          1
        ]
      },
      "http": {
        "enabled": false,
        "server": "http://localhost:6200",
        "path": "/notification",
        "useAuth": false,
        "user": "",
        "pass": ""
      },
      "email": {
        "enabled": false,
        "sourceEmail": "[email protected]",
        "destinationEmails": [
          "[email protected]",
          "[email protected]"
        ],
        "smtp": "smtp-relay.gmail.com (UPDATE THIS)",
        "port": 465,
        "tls": true,
        "user": "",
        "pass": ""
      }
    }
  }
}
Of course, you'll want to change some of those fields to match your own entity's upstream API server address, name, logo, etc. In the json file above, take note of the fields commented which must be changed after the first ABI synchronization phase completes. To be clear, the example above is configured for the ABI sync process, which must happen before the indexing phase. the fields below the lines starting with _comment are the boolean variables which need to inverted after the ABI scan is completed.
Before starting the ABI scan, you ought to test that worked correctly:
./hyp-config chains list
./hyp-config chains test proton
Creating Another ZFS Partition For Elasticsearch's Data
When my node was about 60% synced, I noticed that my main file system was going to run out of space.
eos@hyperion:~/hyperion-history-api$ df
Filesystem                1K-blocks      Used  Available Use% Mounted on
tmpfs                       6543464      1652    6541812   1% /run
/dev/md3                  919652204 508491096  364371684  59% /
tmpfs                      32717304         0   32717304   0% /dev/shm
tmpfs                          5120         0       5120   0% /run/lock
/dev/md2                    1011148    137932     804508  15% /boot
/dev/nvme1n1p1               522984      5120     517864   1% /boot/efi
tmpfs                       6543460         4    6543456   1% /run/user/1000
datavolume               2781099904       128 2781099776   1% /data/hyperion
datavolume/blocks        2911697536 130597760 2781099776   5% /data/hyperion/blocks
datavolume/state-history 3494311552 713211776 2781099776  21% /data/hyperion/state-history
Depending on the unique hardware setup that you have, now may be a good time to do what I just did and moved my elastic data from /var/lib/elasticsearch, which was on my server's core file system which is only 1 terabyte to another ZFS data volume that I created once I realized that with each batch of blocks I indexed, my internal file system's available space was declining while my /data disc, which is about 4 terabytes, stayed the same size. Out of all of the components required to run this gigantic system, Elasticsearch is far the most resource hungry.
If you are running a dedicated server that has one huge disc, you don't need to worry about this. However, if you set up a server with one smaller and one larger raid array like I did, you may want to tell Elasticsearch to store it's database on the larger disc. I ended up doing this when I was about 60% through the batched block index process, so I had to create another volume and then use rsync to copy all the existing data to that volume. If you haven't started indexing yet, skip that part*.
sudo zfs create datavolume/elasticsearch
sudo zfs set atime=off datavolume/elasticsearch
sudo zfs set recordsize=16K datavolume/elasticsearch
sudo zfs set compression=lz4 datavolume/elasticsearch
sudo zfs set primarycache=metadata datavolume/elasticsearch
sudo zfs set logbias=throughput datavolume/elasticsearch
sudo chown -R elasticsearch:elasticsearch /data/hyperion/elasticsearch
sudo chmod 750 /data/hyperion/elasticsearch
# Make sure elastic is NOT running
sudo systemctl stop elasticsearch
# Double check
sudo systemctl status elasticsearch
# Copy all existing indices, logs, and metadata if required *
sudo rsync -aHAX --info=progress2 /var/lib/elasticsearch/ /data/hyperion/elasticsearch/
Edit /etc/elasticsearch/elasticsearch.yml and change path.data from /var/lib/elasticsearch to /data/hyperion/elasticsearch.
path.data: /data/hyperion/elasticsearch
Now start Elasticsearch and make sure that everything works correctly.
sudo systemctl start elasticsearch
sudo journalctl -u elasticsearch -f
I haven't deleted the contents of /var/lib/elasticsearchrm -f'ing that directory to get back all that precious disc space. (Which as of this moment, which is after the ABI scan process appears to be about 375 gigabytes with my database indexed to from 200000000, and a current latest block of 348559941. I am currently running a batch from 200000000 to 250000000, which is a potentially dicey range, so, and by the way, I also disabled the live_reader boolean parameter in the proton-chain.json config file, because I realized that I may as well wait till I am synced to the latest block before indexing currently produced blocks in order to conserve system resources. Don't worry about this yet, first , you need to do the ABI scan.)
The ABI Indexing Process
Assuming that no errors are thrown, you should be good to begin the ABI indexing process.
./run.sh proton-indexer
Currently, I am waiting for that process to finish. I will continue updating this after it does.
12 Hours Later
The Long Process of Batched Indexing
Now, according to the folks in the block producer telegram channel, I must change those JSON fields that I noted in the config I pasted above to their opposite boolean parameters (perhaps except live_reader) and run this again, and again ... and again. I've been encouraged by the guys in the chat is to do this next run in batches, by adjusting the start block and end block like 0-10000000, 10000000-20000000, etc.
I was told that this part would take a long time. Anyway, here's what that looks like:
This seems to be going fast, so maybe I'll increase that block interval, or better yet, write a shell script to handle this. After only 10 minutes or so:

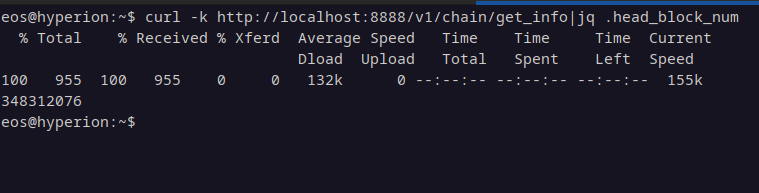
So, you'll need to run this, increase the start_block and end_block fields in the chains/proton-chain.json incrementally with a range that suits the requirements of your system, and then rinse and repeat until you get to the head block. You can find the head block by querying your nodeos endpoint:
By the way, I believe that it is best to not enable live_reader until after you have all of the historical blocks indexed. Note that you may see messages like "No blocks are being processed, please check your state history node" when the live_reader is disabled:
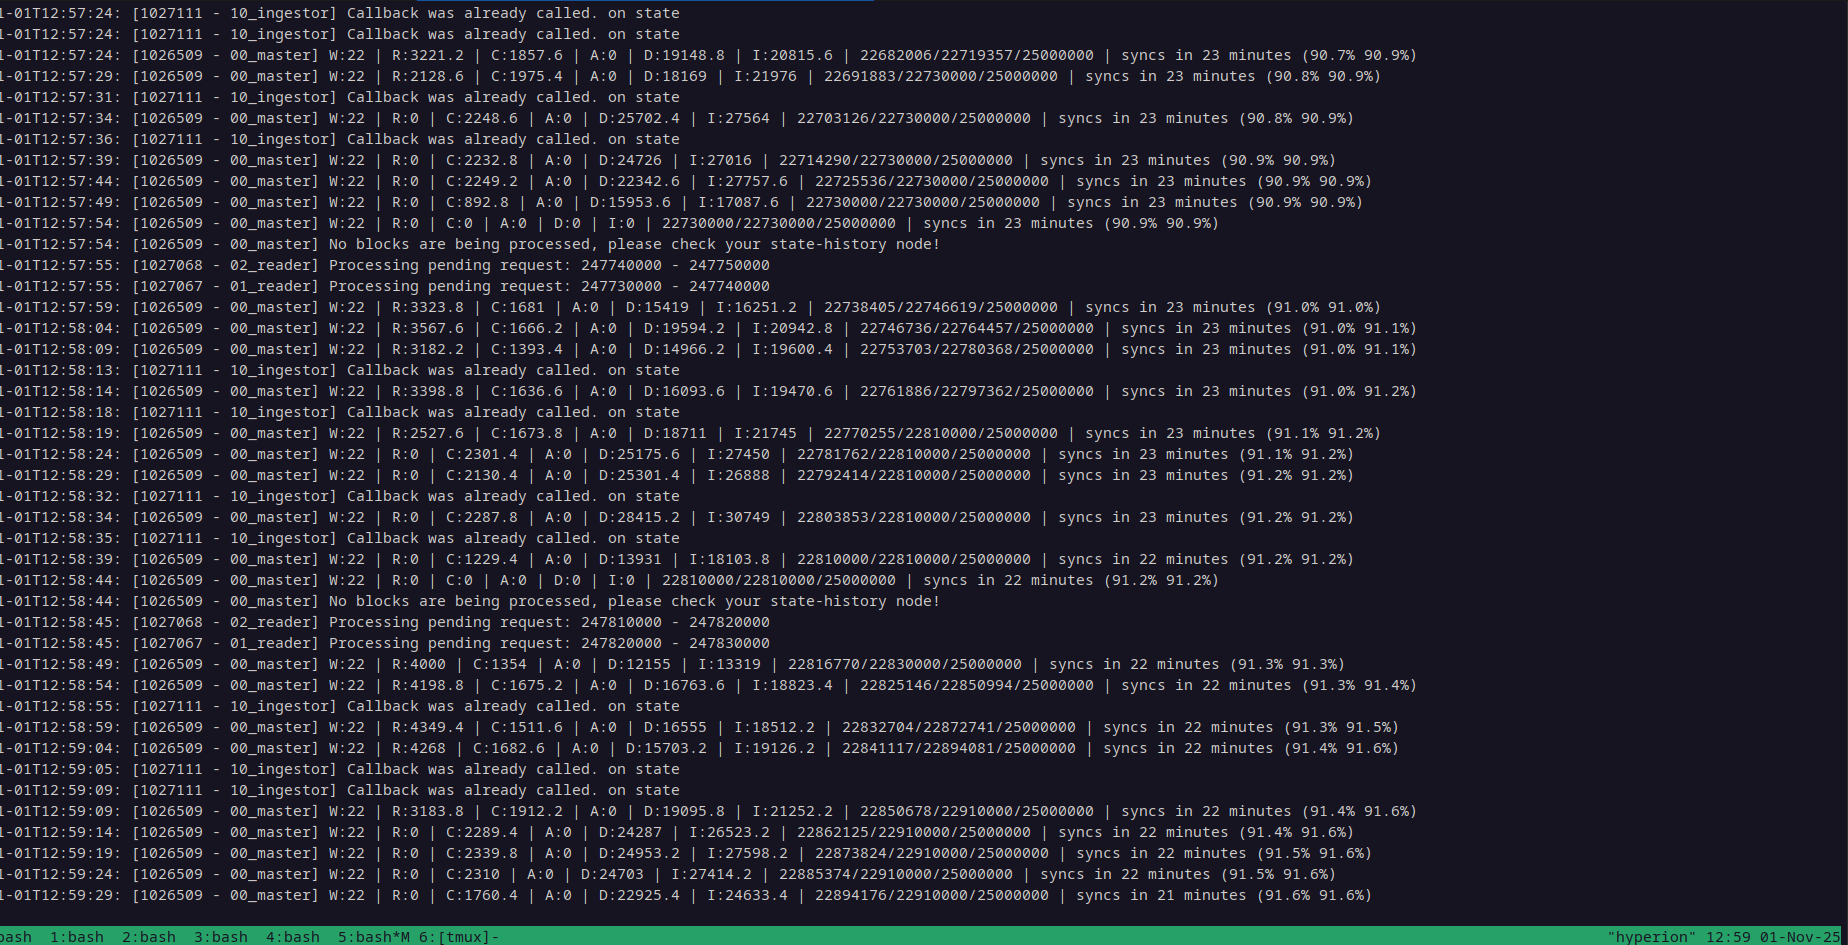
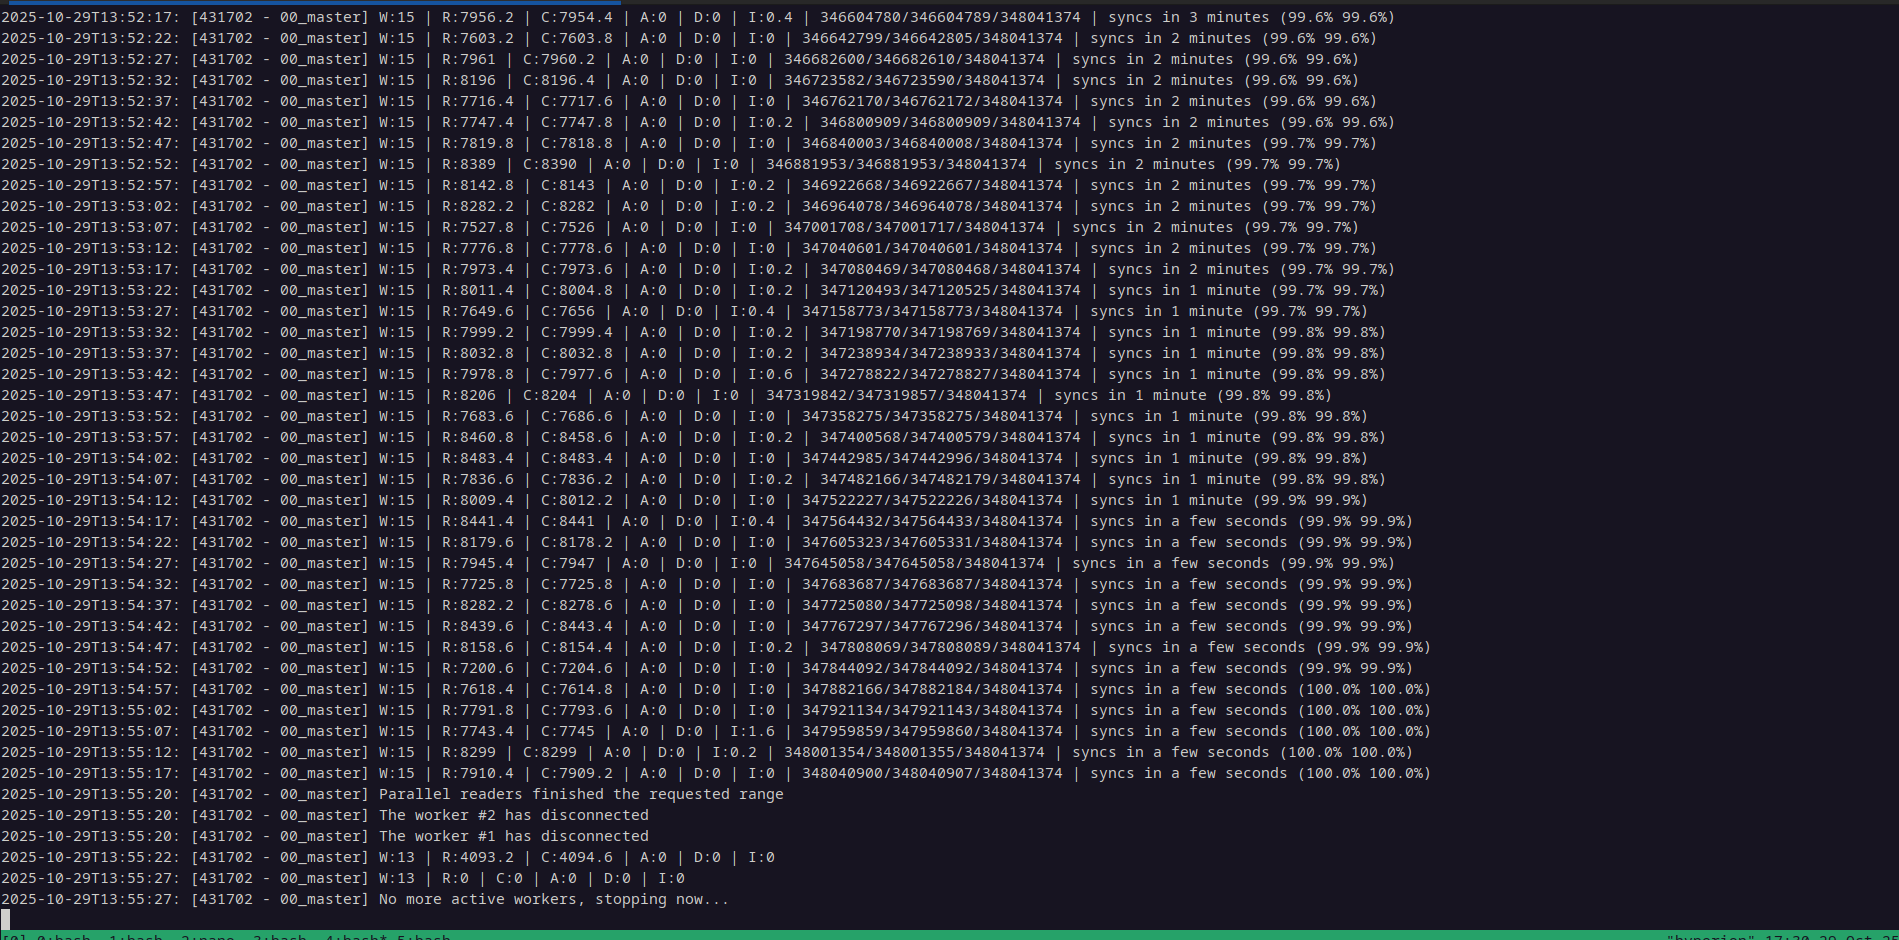
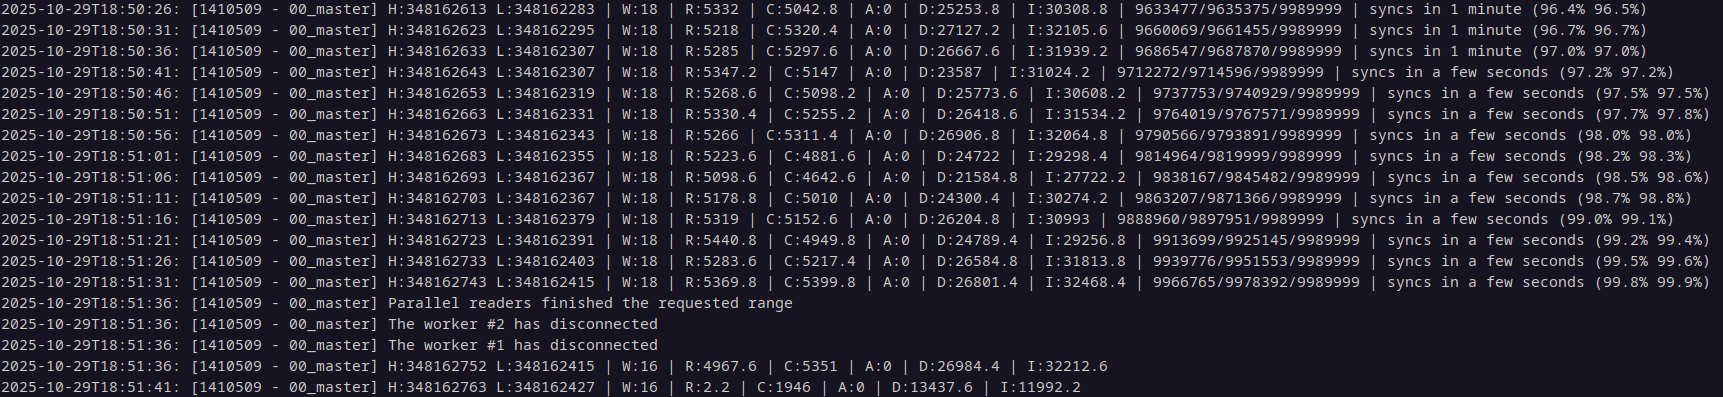
You will know when you see the "parallel workers finished the requested range" messages that a batch has completed, as seen in the image below.
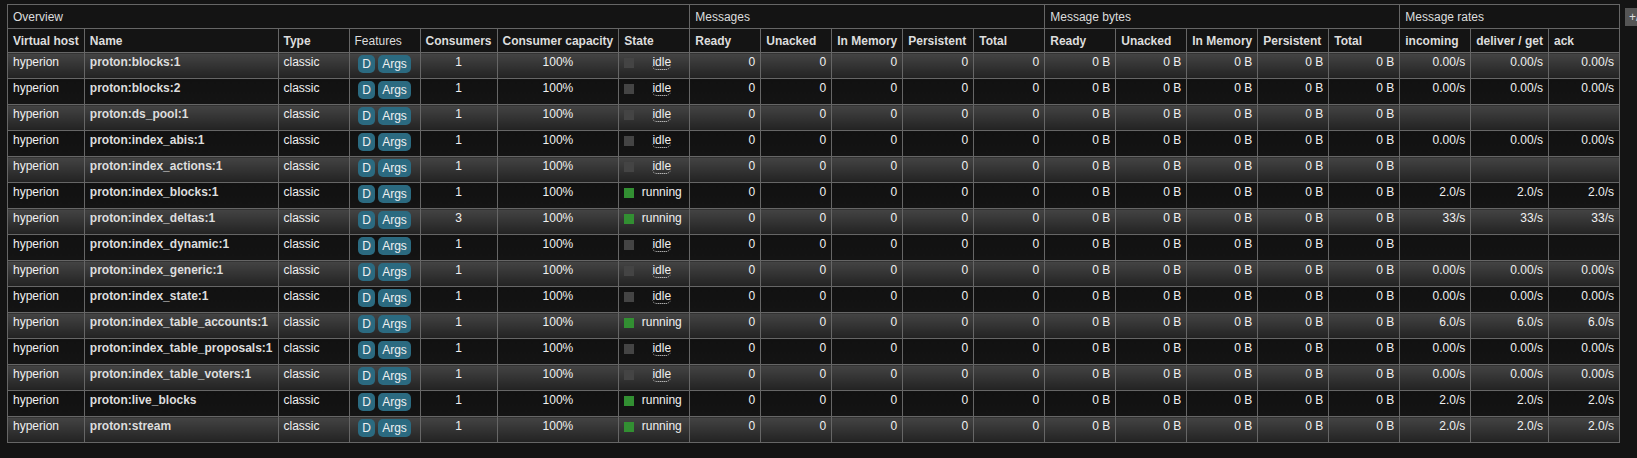
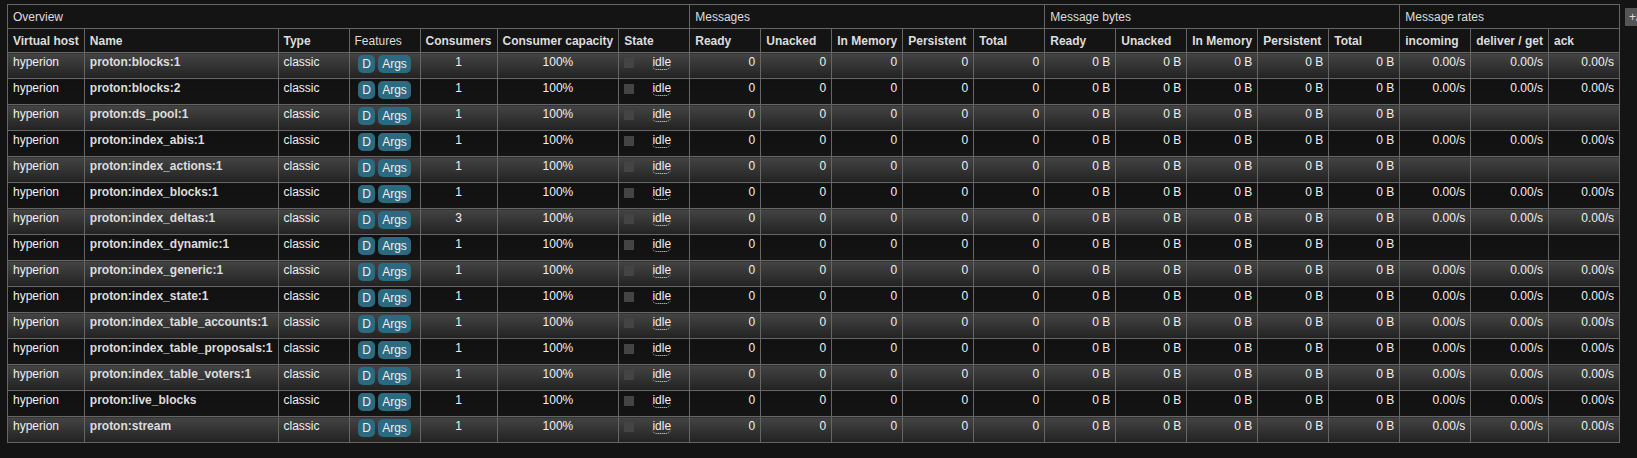
It's never a bad idea to check RabbitMq before stopping the indexer. When it's indexing to Elasticsearch, you'll see plenty of activity such as this:

After seeing the message logs indicating the workers have stopped, check RabbitMq, you should see much less going on:
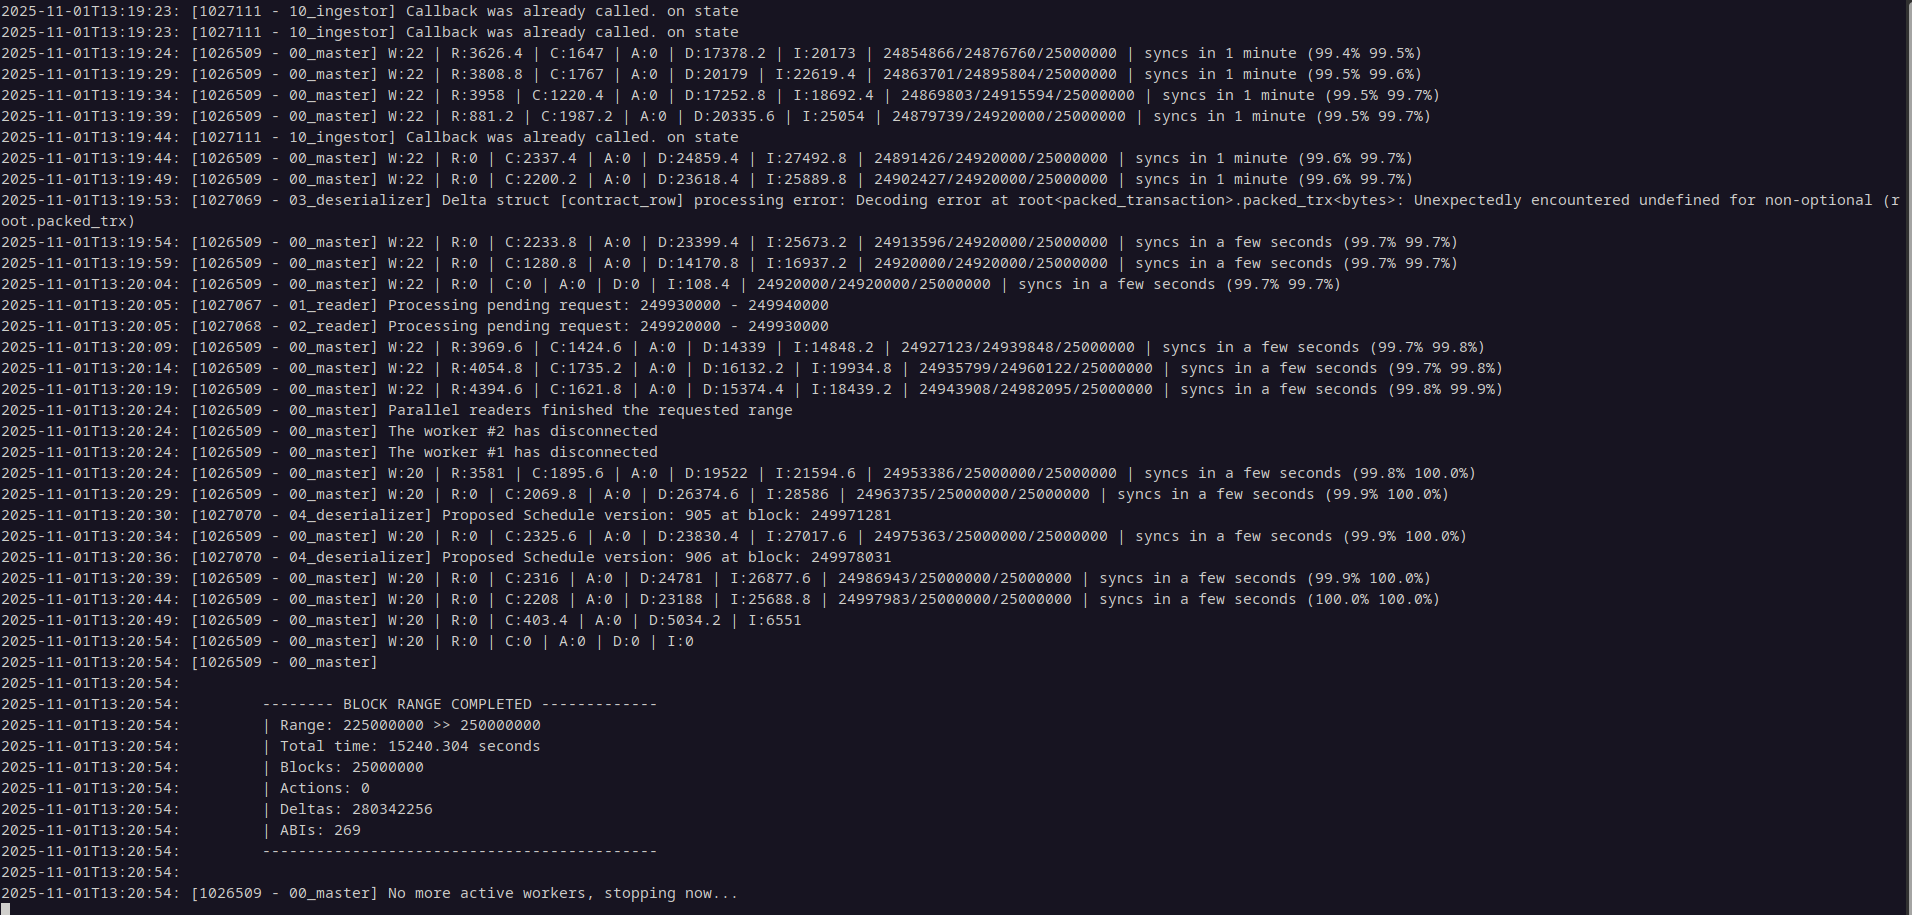
For the sake of completeness, I'll add this screenshot which is what a finished batch looks like once the configured range has completed, without new blocks being indexed:
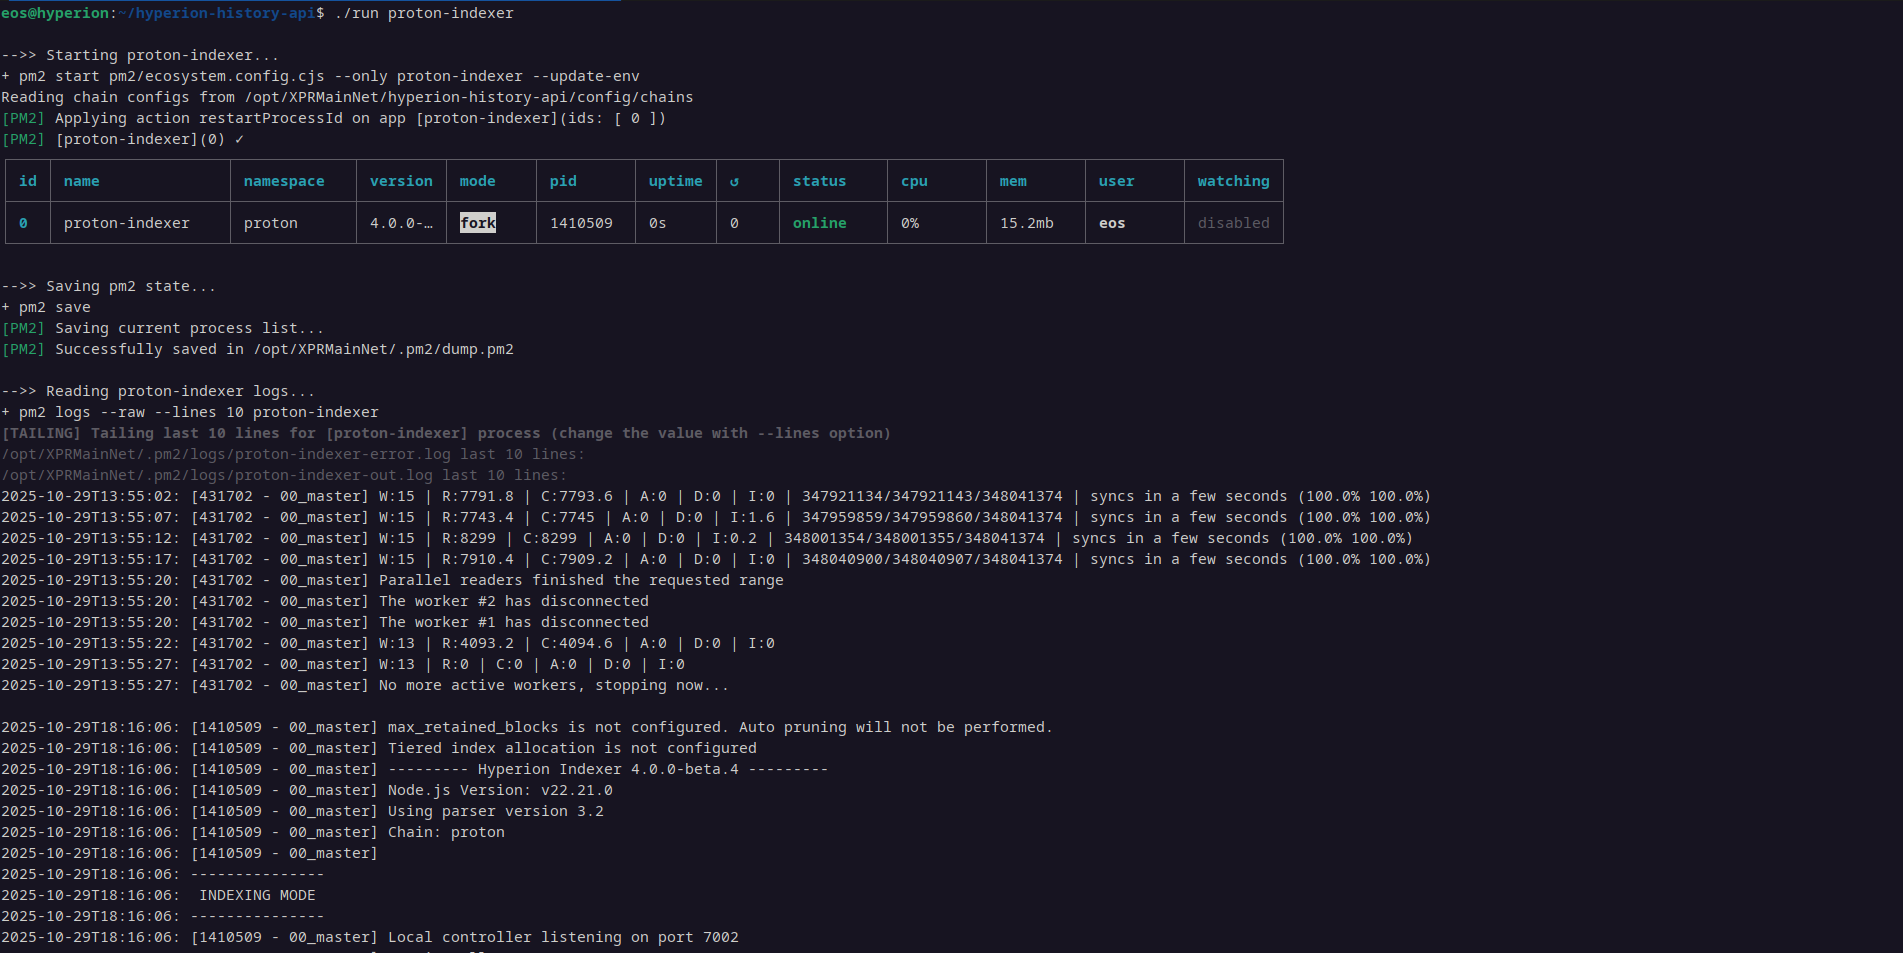
When you get to this point, gracefully stop the program with this command, ./stop proton-indexer.
Wait for the stop script to complete, double check the RabbitMq interface, note the last indexed block in the output, as this+1 will be your next start_block if you accidentally shut down prematurely instead of your current end_block that you were targeting + 1. Control + c the output and edit your config/chains/proton-chain.json file to increment the next target block range, and then run the indexer again. When shut down, you won't see anything on RabbitMq.
./run.sh proton-indexer
In the second batch, I set my start_block to 10000000 and end block to 30000000, effectively doubling the batch size because my system seems to be able to handle it. While indexing, a range of 20000000 blocks, my system's CPU usage is nearly maxed, and the process takes just a little longer, and the resource consumption gets a little higher with each iteration, due to the ever expanding nature of the blockchain.
Run through this process. As of right now, if you batch in increments of 20000000, you'll have to do this ~ 17 times. I am about 50% done the process as of this moment. The system resources become ever-more demanding as you go. Once I got to block
After this process is completed, you need to start the api with ./run proton-api. Finally, configure an nginx reverse proxy with TLS enabled serving https to 127.0.0.1:7000. Configure your DNS like you're setting up any other web service. Our indexer will be reachable at https://hyperion.luminaryvisn.com as soon as I finish indexing my node, which ought to be within the next few days.
Some Final Thoughts
Hyperion isn't as daunting to set up as it seems. It is however quite a complex process, but once you do it, you'll see that it's really not so bad. I got through it between the documentation and blog posts linked in this post, as well the very friendly community in the block producers telegram channel. The EOSphere blogs I somehow missed till a little later in the process and are very useful and more comprehensive than this blog. This blog is specifically for the Proton Network.
Because this system is so resource intensive and complex, it's a good idea to run this behind a content distribution network so that you have a WAF in front of it. The internet is still like the wild west, so I would recommend at least using Cloudflare – you don't necessary need to even pay for that, and when configured properly can save you a lot of hassle. In fact, this is arguably one of the best use cases for a CDN, as all data on a blockchain in intended to be public, and CDN's when used for services that require privacy may pose a risk.
After I am done indexing, there will probably be a couple of other things that I will need to do before exposing the Hyperion api to the public. If you made it this far, I am confident that you can set up a reverse proxy, but I will write a third post to conclude this series, explaining how to do all of that.
Additionally, I am certain that there will be maintenance required from time to time, and I am currently assuming that I did everything correctly thus far. If that turns out not to be the case, I'll update this post or add that to my final post of this series, depending on whichever makes more sense.
Until then, thank you as always for reading The Luminary Edition, and remember to Vote Luminary Vision! After all, we are now about to be one of a minority of block producers that are providing Hyperion state history resources, which the network is currently in need of more of, as existing services are reported to be strained at the moment. Luminary Vision is investing in the network, because we're passionate about The Proton Chain.
PS – if you are considering becoming a block producer on Proton, Telos, EOS, or any other chain that uses the EOS stack, you can always hire me to do so. Feel free to reach out to either me or my client on Telegram or by email. You can find us lurking in the Proton community Telegram channels.